
Neil Crawford
Building the Sopwith 1914 Schneider Racer
in 1/72
Neil Crawford
I chose the Tabloid because I thought it would be an easy conversion from the
Eduard "Sopwith Schneider" 1/72 kit. Then I talked to Anders Bruun....... and
the bad news was that I was going to have to do lots of rebuilding, the good
news was that I could have Anders description and drawings (if I promised to
write this!). So, the first thing to do was to check the kit against Anders
drawings.

 In
fact the bad news dissolved when I did this, it was the 1/48 kit of the Eduard
Baby that needs a lot of reworking, the 1/72 Schneider kit is nearly perfect
dimensionwise. The only major rebuilding necessary is the rear float, and filling
of aileron gaps. Unfortunately the Eduard kit is not one of their latest, so
a lot of extra refinement is required to bring it up to competition standard.
I used the P/E cockpit interior parts, not because I thought they were accurate,
but because I had no other references, and I thought they would look nice.
In
fact the bad news dissolved when I did this, it was the 1/48 kit of the Eduard
Baby that needs a lot of reworking, the 1/72 Schneider kit is nearly perfect
dimensionwise. The only major rebuilding necessary is the rear float, and filling
of aileron gaps. Unfortunately the Eduard kit is not one of their latest, so
a lot of extra refinement is required to bring it up to competition standard.
I used the P/E cockpit interior parts, not because I thought they were accurate,
but because I had no other references, and I thought they would look nice.
 The
wing surfaces were rather rough, undersides OK, so I decided to skin all top
surfaces with thin plasticard. I embossed the ribs with a pencil, then glued
on with CA, trailing and leading edges fixed up by taping along the edge and
filling the gap with CA. The build-up of CA means they can be sanded to a knife
edge.
The
wing surfaces were rather rough, undersides OK, so I decided to skin all top
surfaces with thin plasticard. I embossed the ribs with a pencil, then glued
on with CA, trailing and leading edges fixed up by taping along the edge and
filling the gap with CA. The build-up of CA means they can be sanded to a knife
edge.
The floats in the kit are slightly too wide, so I bit the bullet and took out
my Dremel with the biggest saw attached. I sawed them in half, losing a couple
of mm in the process, this is what I had hoped for, so then I just cleaned up
the edges and glued them back together. I knew I had to skin them so I didn't
need to tidy them up. I had made up some plasticard skins that were slightly
oversized, which I now glued on so as to simulate the flange that is visible
on photos.
 |
| The rear float was made undersize from scrap plastic, then covered with mahogany planking, bent around the float, after soaking in boiling water, and glued on with CA. You can see where I sanded down too much at the rear end, the white plastic shows through, that is fixed with a lick of paint. |
The rear float on the Schneider racer is a rather odd affair, it looks as if
they sliced a piece out of a very fat aerofoil, and stuck it under the tail.
It seems to be made of varnished wood, so I decided to skin it with mahogany
model ship deck planking. I have strips about 1mm thick, and 5mm wide which
was perfect.I stuck a piece in a cup of water and boiled it in the microwave
for a minute or two. I'm not sure if this helped, but I was able to more or
less bend it in to a U shape.
I then made the float out of bits of plastic and Milliput - it didn't need to
be perfect, the important thing was that it was a little smaller than it should
be, so as to give room for the wood skinning. I stuck the wood on in 3 stages,
using CA , first the leading edge of the float to the inside of the U-shaped
wood-plank, after that dried, I glued it on a bit more, this time pressing it
in place, next I glued it all up to the trailing edge. I glued my fingers on
each time for good measure !
The result was somewhat lumpy and a bit splintered, but the CA kept everything
in place, and it means that sanding to a smoothly curved leading edge is possible.
After I'd done that, I glued the whole thing to a bit of plank, for the float
bottom, and then just cut around it, and sanded to shape. Finally I added a
couple of bits of wood to the top for the fairing to the fuselage.
!
The result was somewhat lumpy and a bit splintered, but the CA kept everything
in place, and it means that sanding to a smoothly curved leading edge is possible.
After I'd done that, I glued the whole thing to a bit of plank, for the float
bottom, and then just cut around it, and sanded to shape. Finally I added a
couple of bits of wood to the top for the fairing to the fuselage.
I meant to use the P/E rudder from the kit, but I lost it somewhere, so I made
a new one from a bit of planking, sanded to shape. I added tiny brass reinforcements,
that were in fact the push-rods from the P/E set for the Clerget engine that
I wasn't using. The brass bits were stuck on with the same varnish as I used
for the float and rudder. The result looks much better than the P/E one that
I lost.
The nose cowling on the racer is cut off straight in front, but the kit has
a shallow 'Vee' as per later Schneiders. I glued in a piece of plasticard with
CA, and sanded straight, I also glued in the P/E front engine bearing from the
kit, and a supporting ring for the propeller. There was a lot of sanding necessary
to get the cowling into shape. Luckily there was plenty of material (more on
this later...) so no problem finally getting it smooth.
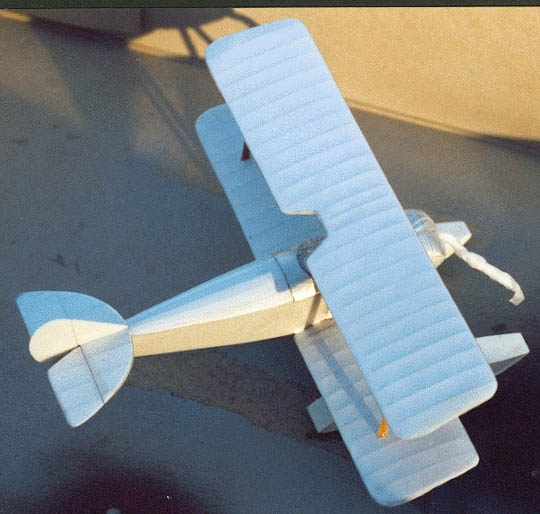 |
| Ready for painting, the foil-covered nose has been masked off with parafilm (that's the funny looking tail on the nose). Difficult to see, but at this stage the float-struts are on front to back, so a nice little hassle in store, removing and reglueing floats. |
I did the metal nose panels before painting because when I apply kitchen foil, I make a mess, and I often have to remove foil and start again, clean up with alcohol etc. This usually plays hell with paintwork, so I do it the other way around. If I happen to get some paint on the foil it's easy to clean off. I applied foil as described in previous articles, but this time I burnished small circles in the foil with a rolled-up cone of sandpaper, finished off with a matt varnish it looked great, but totally unrealistic, so I ripped it all off and did it again. This time I just polished the cowlings, and it looks much better. I've heard that Sopwith did their burnishing with corks and grinding paste. A cork head is 0.15mm in 1/72 scale, that's just too tiny to be possible, so it's better left alone.
Painting was straightforward, after masking off the nose with parafilm. I had already assembled the model before painting because I wanted to make good joints between the floats and the fuselage using plastic cement, and paint tends to spoil joints. It didn't work, because I had reversed the front struts with the rear ones so had to rip the floats off and reglue them correctly.I had also glued on the top wing, but naturally, it fell off during painting
 |
| Here is a (faked) picture of how the propeller was carved, first 4 layers of mahogany model ship planking glued together with CA, then roughly carved by knife, and finally sanded to shape using varying grades of sandpaper. |
I had made the wing struts from wood, because I don't like the P/E struts supplied
in the kit, so now I glued it all back together using epoxy. The engine was
obtained from the Aeroclub range, their 100hp Monosoupape looks very good with
diluted black paint on. I hadn't reduced the thickness of the cowling enough,
so I was reduced to cutting off the valve mechanism from all the top cylinders
before I could shoehorn it into place.
 Anders
very kindly supplied me with decals, and I must say that I wish the kit manufacturers
would make decals like his, they were perfect, no problems at all. There is
a row of cooling holes in the cowling, I simulated this by using Letraset dots
transfered to decal, I couldn't get them straight when I tried to rub them on.
Anders
very kindly supplied me with decals, and I must say that I wish the kit manufacturers
would make decals like his, they were perfect, no problems at all. There is
a row of cooling holes in the cowling, I simulated this by using Letraset dots
transfered to decal, I couldn't get them straight when I tried to rub them on.
Rigging is fairly straightforward, but there's plenty of it. The flying wires
should be double if you're feeling silly, and in that case, the rear ones are
also the controls for wing warping, and should meet where they run into the
fuselage below the pilots seat.
 There
are some oddments to add, but not too many (a nice thing about racers). I couldn't
manage the pitot tube thingie down at the bottom of the left strut, so I botched
something together from a couple of copper wire strands - that is something
that cries out to be photo-etched. Talking of photo-etch, struts can be dressed
up with bits from (and cut off from) the Eduard P/E set.
There
are some oddments to add, but not too many (a nice thing about racers). I couldn't
manage the pitot tube thingie down at the bottom of the left strut, so I botched
something together from a couple of copper wire strands - that is something
that cries out to be photo-etched. Talking of photo-etch, struts can be dressed
up with bits from (and cut off from) the Eduard P/E set.
So that's it, plenty of good clean fun, and a lovely litle model as a result!